

How to test your affiliate program before launch
An affiliate program is a money flow, not just a marketing channel — every tracked sale ends in a commission you actually pay out. That makes a misconfigured program expensive in a way a quiet referral bug is not: a wrong commission rate, an exclusion that does not apply, or a payout that overpays all cost real money once partners are live. Testing before launch lets you watch each decision in that chain — recruit, track, approve, pay — against a test affiliate, so the only sale at stake is one you placed yourself.
The approach is to run one full sale, end to end. Register a test affiliate and approve them, preview their portal, drive a small sale through their link or coupon, confirm the commission calculates correctly, run a payout, and check every email along the way. This page is that dry run, step by step, before any real partner is watching.
Before you start
Section titled “Before you start”Have these ready, or the test will not produce a result:
- App embed is on. Affiliate links and any on-site affiliate surfaces only work when the app embed block is enabled in your theme. See the FAQs for how to turn it on.
- The affiliate program is on, using the switch next to the Affiliate program title. While it is off, affiliate links stop working and orders create no sales.
- A campaign is active with the commission structure you want to test - flat, percentage, or tiered. Review it in affiliate campaigns and commissions.
- At least one payment method enabled, so you can complete the payout step. Configure these in affiliate settings.
- A test email inbox you control to act as the affiliate and receive their notifications.
1. Register a test affiliate
Section titled “1. Register a test affiliate”Create an affiliate the same way a real partner would join, so you exercise the registration path:

- Open the store page where you added your affiliate registration form (the form only exists once its app block is on a page, see registration form) and apply with a test name and email. If you turned on CAPTCHA for the form, turn off any ad blocker first: it can stop the CAPTCHA from loading. Bloop also limits repeated sign-ups from the same connection, so if a quick second attempt is refused, wait a minute and try again.
- The applicant lands in your Affiliates tab with a pending status.
- Alternatively, add the affiliate manually from the Affiliates tab if you want to test the manual-add path instead.
See managing affiliates for both paths.
2. Approve the test affiliate
Section titled “2. Approve the test affiliate”A pending affiliate cannot earn, so approve yours:
- Open the affiliate’s record in the Affiliates tab.
- Change the status to approved.
- In the Affiliate campaign card, choose Select campaign and pick the campaign you are testing. Only affiliates approved automatically at registration get the default campaign; anyone you approve by hand needs a campaign assigned, or their link tracks nothing.
Once they are approved and have a campaign, their unique referral link is live, and approving triggers the approval email. Note their referral link, and the discount coupon if you assigned one - you will use it in the next step.
3. Preview the affiliate portal with “login as”
Section titled “3. Preview the affiliate portal with “login as””Before driving a sale, confirm the affiliate sees the right portal:

- From the affiliate’s record, use Login as affiliate to open their portal session. The link it opens works once and expires after 5 minutes, so if it has expired, select Login as affiliate again.
- Check their stats, referral link, and payout details render correctly and match your branding.
There is also a demo portal you can open without selecting a specific affiliate. It shows a sample store rather than your own branding, and its settings are read-only, so use it to see what partners get, not to check your styling. Details are in managing affiliates.
4. Drive a test sale
Section titled “4. Drive a test sale”Now act as a customer who arrives through the affiliate:
- Open the affiliate’s referral link in a fresh browser so the attribution cookie is set, or apply the affiliate’s coupon at checkout.
- Add the cheapest product you have and complete a real Shopify order within the campaign’s cookie window. Check out with an email that is not the test affiliate’s own: an order where the buyer’s email matches the affiliate’s is kept Pending as a self-referral.
Keep the order small. To avoid real spend, use a draft order marked paid, a 100%-off internal discount, or Shopify’s test payment gateway (Bogus Gateway) in test mode. The order still has to complete and be paid for the sale to register: cancelled or unpaid orders create no sale, unless your order settings create sales on fulfilment.
5. Confirm the sale and commission
Section titled “5. Confirm the sale and commission”Open the Sales tab and find your test sale. Check:
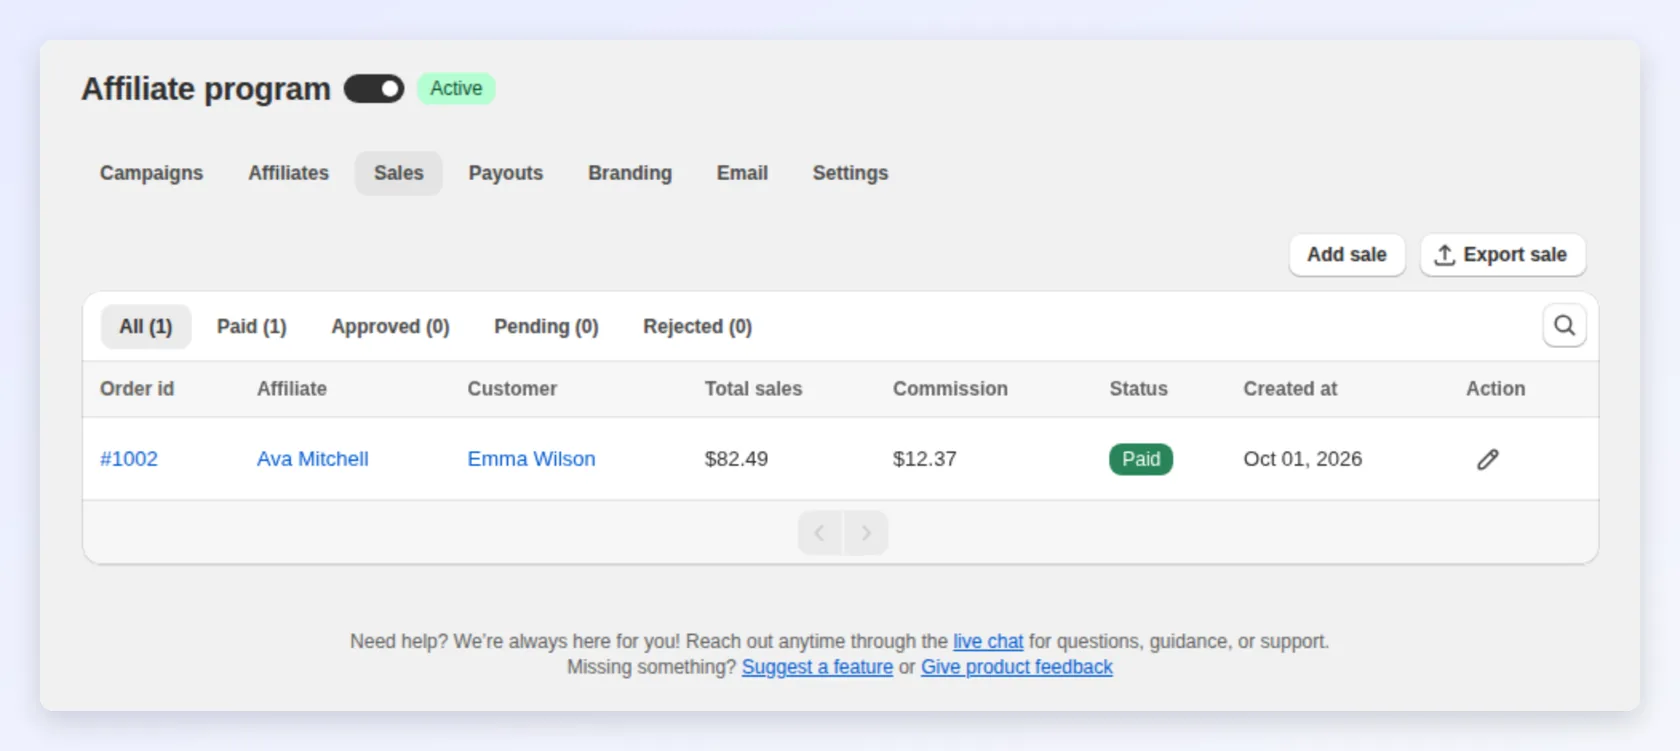
- It is linked to the right affiliate and campaign.
- The status is Pending. Sales start pending until you approve them, unless Order approval automation in affiliate settings approves them immediately.
- The commission matches your campaign rules — the correct percentage or flat amount, with exclusions, caps, and tiers applied as configured.
Each sale stores a snapshot of the rule that applied, so you can see exactly why the commission came out as it did. The full calculation logic is in affiliate sales tracking.
Test without a storefront purchase (optional)
Section titled “Test without a storefront purchase (optional)”If you cannot place a storefront order, add a sale by hand instead:
- In the Sales tab, choose Add sale.
- Select your test affiliate — they must be approved, since sales cannot be created for pending or rejected affiliates.
- Enter the order details, total sale, and commission.
Add a note to a manual sale so you can tell it apart from tracked ones later.
6. Approve the sale
Section titled “6. Approve the sale”Confirm the approval step works:

- In the Sales tab, approve the pending test sale with the tick icon on its row (or Approve on the sale’s own page). Sales are approved one at a time.
- The affiliate’s approved balance updates, and an approval email goes to the affiliate.
Try rejecting a second test sale too, to confirm the declined email behaves as expected. See affiliate sales tracking.
7. Run a test payout
Section titled “7. Run a test payout”Turn the approved balance into a payout to verify the money flow:

- Open the Payouts tab, filter by Pending, and select your test affiliate.
- Review the approved sales in their balance and record a payout.
When you record it, Bloop creates a payout record, flips the included sales to paid, reduces the approved balance, and sends the affiliate a “new commission payout” email. If anything looks wrong, you can revert the payout to return the sales to approved. The full behaviour is in affiliate payouts.
8. Check the affiliate emails
Section titled “8. Check the affiliate emails”Confirm the affiliate received the right notifications along the way — registration/approval, sale approved (and declined if you tested a rejection), and the new-payout email. Review and edit any of these templates under your affiliate email settings; see affiliate email notifications.
9. Reset before you go live
Section titled “9. Reset before you go live”Clean up your test data so it does not skew real reporting:
- Revert the test payout first, then reject or remove the test sale (an approved sale must be marked as pending before it can be rejected). A paid sale has no actions until its payout is reverted.
- Set the test affiliate to rejected (there is no delete-only “paused” status), or remove them.
- Confirm the app embed stays on and your real campaign settings are restored.
Once a test sale has flowed cleanly from registration through approval, commission, and payout — with the right emails firing — your affiliate program is ready to launch.
Related
Section titled “Related”- Getting started with affiliates — the setup this test validates.
- Managing affiliates — registration, approval, and “login as”.
- Affiliate sales tracking — how the commission in step 5 is calculated.
- Affiliate payouts — the payout you run in step 7.
- Affiliate email notifications — the emails you check in step 8.